Welcome to my BlogSpot. I have created this blog in hopes of inspiring everyone to cook. I have found my inspiration from living in both Southern and Northern California. My influences in flavors have come from family recipes and meals with emphasis on healthy foods, marrying into an Italian family and the ethnic flavors throughout California. There are so many wonderful memories connected to our family dishes as well as new memories in the dishes that have been recently created. My husband, Randy who is recently retired, has been my biggest supporter and inspiration in our kitchen. He is my taster, my sous chef, and has created some really great dishes himself, which will be added to this blog. It is my hope that you too will be inspired to cook and create your own dishes for your loved ones and enjoy the craft of cooking.

One thing I ask of you is if you print out, email and pass out my recipes, please include my name and link.

Be sure to check out my Sweaty Equities blog about the ups and downs of crafty projects and our DIY remodels.
You can find it at http://sweatyequities.blogspot.com/

Friday, December 9, 2016

SuperCali Tamales

SuperCali Tamales

Before starting, fill a large container or pot with dried corn husks and enough hot water to cover the husks, and cover with a lid, flipping occasionally so all are softened.
·        2 packages of corn husks, soaked in hot water. (it may look like a lot but many of the husks are too thin to wrap.
·        2 pounds pork shoulder, shredded

Salsa Rojas Guajillo;
·        4 Oz (2 bags) Guajillo Chile Pods, seeded and toasted in a pan.

·        2-4 Chili Arbol  pods – depending on your taste for spicy foods, deseeded and lightly simmering in a small pan of olive oil until soft

·        2 large tomatoes or 1 can tomatoes
·        1 large onion
·        2 cloves garlic
·        1 quart chicken stock
·        Salt to taste
Combine the above ingredients, including the olive oil in a large pot and simmer until softened. Blend in a blender until smooth.
***(Or you could go the easy route and buy a couple large cans of red chili enchilada sauce instead of making the Salsa Rojas, but there is a difference in taste)

Shred the pork and and mix in some of the Salsa Rojas Guajillo

Masa Mix
·        4 Cups Maseca 

·        3-1/2 cups Chicken Stock , ½ cup of Salsa Rojas Guajillo.
·        2 teaspoons baking powder
·        1 cup of shortening or lard. (I use coconut oil)
·        1 teaspoon salt
Mix all ingredients thoroughly until consistent with loose cookie dough.  (makes for easier spreading)

Now here’s the part that requires a little practice. Using a rubber spatula or back of a spoon, spread Masa onto the lower half and wider ends of the husk.  Fill center of masa with chicken.  Fold the right side of the husk over the filling, pull back the husk slightly so you can over-lap the masa from the left side, then close and fold the top of the husk Place the tamale folded sides down on bottom of steamer and steam for 1 hour, being careful not to run out of water at the bottom.
Serve with rice and beans
You can substitute chicken for pork

By Susie Tronti


Monday, February 15, 2016

How to Cure and Cold Smoke Your Own Salmon


Who doesn’t love smoked salmon? It is such a versatile meat which can be used as an appetizer, in pasta and salad dishes, or on its own carpaccio-style drizzled with olive oil and dressed with dill, fennel and capers. Or you can simply make a sandwich with it. The possibilities are endless!

I’ve always wanted to be able to make my own cured smoked salmon and when I found the perfect cut, about 3 pounds, I knew it was time. I did a lot of research on the internet and there are different combinations of the “sand” or dry brine, made to bury the salmon in. (Back in the old days the Norwegians would bury their catch in the sand to cure their salmon) The “sand” consists of a combination of sugar and salt for the cure and added flavors. Many were equal parts sugar to salt and some were more salt than sugar. Some used maples or honey and some used pure unrefined cane sugar. I just stuck to the salt sugar brine.


I came across a site that I thought had the best flavor combination (Georgia Pellegrini was the site) and tried making it verbatim. The sand/brine smelled so good! I love reading this site’s recipes. -Lots of great recipes on it. http://georgiapellegrini.com/2010/03/01/recipes/how-to-cure-salmon-and-other-fatty-fish/

Check it out and I’m sure you will get inspired too.

Well, I found, for my taste, that the salt/sugar ratio was just a bit too salty for me and I rinsed it well, so I made some changes to it. I ended up, the second time around, keeping the salt/sugar ratio as equal parts and was much happier with it.

There are different methods to cold smoking your salmon. You can buy a special smoking pan and use it indoors but if you have a grill I have an easier and less expensive way to cold smoke. I can’t take credit for it though because I saw how to do it on many different YouTube channels. You will need a new soldering iron that has never been used to solder, (or you will have a metal taste in the fish and that would be a disaster!). You will also need a can. I cleaned out and saved a can of tomatoes. Open the lid of the can 2/3, leaving1/3 still sealed. Bend open the top and drill and hole in the center of the opened lid big enough to fit the soldering iron through. Fill that can with Cherry Wood Chips about 2/3 full. Close the lid and put the soldering iron through the hole. Run the soldering iron plug through a vent hole in the grill or smoker and plug it in. If your soldering iron has an on/off switch, turn it on and you are ready to cold smoke.


 I have included a recipe for the salmon baguette pictured above. Scroll to the bottom for the recipe.

Ingredients for the Smoked Salmon
Ingredients
3 Lemons
3 Limes
3 oranges
2-1/2 cups Kosher salt
2-1/2 cups Sugar
1 tablespoon Whole Coriander
2 teaspoons Peppercorn Medly
3 pounds salmon, boneless and skinless

Here is how the process goes:

I bought 3 pounds of Salmon, skin off and de-boned. Try to find the thickest cut you can.

Combine 2-1/2 cups sugar and 2-1/2 cups Kosher salt and mix thoroughly.

Add the zest of 3 oranges, 3 limes and 3 lemons. (be sure to squeeze the juices of these 9 fruits, combine the juices and use them for the acid part of a salad dressing using my white spice rub and olive oil.

In a spice grinder put in 2 teaspoons of Whole Peppercorn Medly and a tablespoon of whole Coriander. Grind coarsely and add it to the sand/brine mixture. If you don’t have a spice grinder, just use it already ground, but use less of each because it’s already ground down.


Now the trick is to bury the fish in the sand snuggly. Sometimes it’s hard to find a glass baking pan to perfectly fit the mixture with the fish so I have come up with a solution that will help with a full, snug burial. I combined the width of 2 long pieces of plastic wrap and folded the edges together to make a wide long piece of plastic wrap. I placed it on the bottom of a glass pan, then I poured a little bit less than half of the sand on the bottom of the pan, about the size of the piece of fish. I place the dried off 3 pound piece of fish over the sand. I then carefully buried the sides and top of the fish with the rest of the sand/brine. 


I then folded over the sides of the plastic wrap over the fish and then the length of the plastic wrap over the fish. The fish was now completely buried and wrapped up nice and snug.


After it was all wrapped up, I got another pan, about the same size and placed it on the fish, bottom side down and put 2-5 pound weights in the top pan. This weighs down the fish and helps get all the moisture out of the fish. That’s part of the curing process. Place it in the refrigerator.


Now we wait 2 days. Be patient. The fish is curing. All the moisture is being drawn out of the fish.

After 2 days, take the fish out. You will notice that the brine mixture is very wet and the fish has shrunk just a bit and is a bit more dense. 


It is now cured. It needs to be rinsed and dried thoroughly. 


At this point you can eat it and use it in your favorite recipes, but I like to take it a bit further. Place the fish on a rack and put it in a clean refrigerator on a shelf by itself for 12 hours. Keep that shelf free of debris and don’t let anything drip on it. It will form a sticky substance while it is resting in the refrigerator for the next 12 hours.


Now it’s time to cold smoke. You’re getting closer to getting to eat it! You will need a new soldering iron that has never been used to solder, or you will have a metal taste in the fish and that would be a disaster. You will also need a can. I cleaned out and saved a can of tomatoes. Open the lid of the can 2/3, leaving1/3 still sealed. Bend open the top and drill and hole in the center of the opened lid big enough to fit the soldering iron through. Fill that can with Cherry Wood Chips about 2/3 full. Close the lid and put the soldering iron through the hole. Run the soldering iron plug through a vent hole in the grill or smoker and plug it in. If your soldering iron has an on/off switch, turn it on. Pull out the fish and rack and place it on an ice filled pan, fish not touching the ice. (In the cold weather you won’t need to do this ice method) and place it in your grill or smoker. Take some painters tape and seal the holes up on the grill. Now watch for the smoke. Lift the lid and peak in. When you see smoke, close the lid and smoke for 20-30 minutes. Now it is ready!


Smoked Salmon and Cucumber Baguette.

1 Baguette Loaf.
3 Green Onions, white parts only
3 Garlic Cloves
8-10 Marinated Artichoke Hearts, drained of the oil
In a food processor, combine the above ingredients and chop finely.
8 ounces Cream Cheese
The zest of 1 lemon
1 tablespoon Lemon Juice
2 tablespoons Capers
1 teaspoon chopped dill
salt and pepper to taste
Add the rest of the ingredients to the food processor and pulse until well combined.
1 Cucumber thinly sliced on the bias
Cold Smoked Cured Salmon thinly sliced on the bias

Slice and toast the baguette in the oven or a grill. Spread a thin layer of cream cheese mixture. Add 2 slices of cucumbers and top with a healthy amount of thinly sliced Cured, Cold Smoked Salmon.


Enjoy!!!


Sunday, November 15, 2015

Creamy Roasted Asparagus Soup

I love my Vitamix. I use it practically every day. Here’s a very simple and elegantly silky recipe to accompany almost any meal.


1 large Bunch of Asparagus
1 Red Onion
Olive Oil
2 celery hearts, leaves included, chopped
3 Cups Vegetable Broth
1 Pinch Crushed Red Pepper
½ Teaspoon salt, more if the vegetable broth is unsalted
4 Tablespoons Mascarpone Cheese –If you can’t find Mascarpone, cream cheese will do
Trim the asparagus into 2 inch pieces. Use the stems too. Quarter the red onion. Sprinkle some olive oil and toss, to combine the oil with the onions and asparagus. Roast in the oven 400 degrees about 7-8 minutes, until the asparagus is tender/crisp.
Place the roasted onion and asparagus into the VitaMix and add the celery hearts, vegetable broth, crushed red pepper and salt. Set the VitaMix to soup and blend until steaming hot. Add the Mascarpone cheese and blend to combine.
Serves 4-6 people.

Enjoy!

Sunday, November 2, 2014

Pan Seared Salmon over Swiss Chard with White Wine Beurre Blanc.


We have a new favorite restaurant near us in the little town of New Castle California. It is called La Fornaretta Restaurant. It is an Italian restaurant, authentically Sicilian. If you live in the area, check it out. Last night we met friends there for dinner and I had the salmon special. It was a lovely dish of salmon smothered in freshly cooked tomatoes, calamata olives and capers in a white wine reduction served with spinach. It was divine. 2 of the gang had stuffed pork chops over polenta and spinach while one other had the Tutto Mare, a seafood medley over linguini. All were very impressed.
When we got home from church and shopping today, I couldn’t get that salmon specialty out of my head. I know it’s November 2nd but my garden is still gifting us, so I headed to the garden and gathered up some red and yellow tomatoes, a few small onions, some basil, a couple of red bell peppers and a big bunch of Swiss chard.


I needed to come up with a recipe that would satisfy my craving for La Fornaretta in between visits. This concoction did the trick. We sure loved every bite. Even though there are a lot of ingredients, it was fast and super easy. I hope this becomes one of your favorites too.

Now when I cook, I don’t really measure much of anything. For example when I say to put in 2 teaspoons honey, you don’t have to make a sticky mess measuring it out. Just eyeball it. Go with your gut. Trust that you will do just fine.

Pan Seared Salmon over Swiss Chard with White Wine Beurre Blanc.


Serves 4

3 tablespoons olive oil
1 medium onion, halved and sliced
2 small red bell peppers, sliced
1 teaspoon minced garlic
1 cup tomatoes, chopped
8 cups Swiss chard, cleaned and chopped
1 handful fresh basil leaves
¼ cup calamatta olives, sliced
2 teaspoons capers
1 can cannelloni beans
Salt and pepper to taste

4 pieces of salmon fillets
Granulated garlic
Salt and pepper

½ pound penne pasta
Freshly grated parmesan cheese

1 cup white wine
The juice of one lemon
½ teaspoon tarragon
6 tablespoons butter
A pinch of crushed red pepper
2 teaspoons honey

Start your pasta water to boiling with salt and just a bit of olive oil while you prepare your vegetables to cook. Once you’re ready to cook the vegetables, put your pasta in boiling water and cook for 9-10 minutes until al dente.

Meanwhile, in a large deep pan heat the olive oil and add the onions and bell peppers. Sauté until softened. Add garlic and tomatoes and cook until the tomatoes soften and become juicy. Salt and pepper the layers. Add the Swiss chard and the basil leaves, cover and cook on medium heat until the Swiss chard is very tender. Stir in the calamatta olives and capers.  Add the beans and stir. Turn of the heat and add the cooked pasta to the mixture and cover with a lid to keep warm

Sprinkle salt, pepper and granulated garlic on your salmon fillets. Drizzle a small amount of olive oil in a hot pan and add the salmon fillets. Cook at medium/high to get a sear on the salmon and watch for them to cook about 1/3 of the way through. Flip the salmon over and let it cook about 1/3 of the way through again. Remove the salmon from the pan and cover with foil to keep warm. (The thickness of the fillet will determine cooking time)

Beurre Blanc
In the same pan that the salmon came out of and while still hot, pour in the white wine, the juice of a lemon and the tarragon. Let it reduce to about 1/3 cooking on medium/high heat. Add the butter and crushed red pepper. Stir to incorporate until silky smooth, then add the honey and stir just a bit longer. Remove from heat and add to the pasta/Swiss chard pan and mix everything together.

Scoop the Swiss chard/pasta mixture onto the center of a plate and place the salmon on top. Sprinkle with some freshly grated parmesan cheese.

Enjoy!

Friday, August 29, 2014

Surf and Turf Bloody Mary


Have you ever noticed how Bloody Marys are recently resembling a small meal? We have all seen those photos on Facebook or Pinterest that get our taste buds craving the likes of a Bloody Mary with a slider burger and onion rings on one skewer, and a pickle next to the predictable celery stick.—a beautiful work of food art with the benefits of filling up the tummy. I have to say that I have obsessed over these wonderful libations/meals. I have never had one at a bar, but I needed to create on myself.
During this hot summer while we have been slaving away in the backyard covering dirt with concrete, I have been doing a lot of bulk smoking. It’s an easy way to have something on hand to make a quick meal since we have been so busy. Usually by the time the day is finished, we are hot and tired and not a huge appetite. One day I was smoking shrimp. Super easy. –Just toss the shrimp in olive oil, salt, pepper, crushed red pepper and chopped garlic and let it smoke until they turn pink. It’s that fast.


I also like to keep on hand (since we host out of town family members for days) pre-cooked bacon. Kirkland has the best.
So let me get to my point. Hot, sweaty, tired and just a little bit hungry made me think of making a Surf and Turf Style Bloody Mary. Shrimps already done.
I have some bacon that I can dip in some pure maple syrup and cook it off just a bit longer in the oven until the maple is thick and caramelized on the bacon.


We have plenty of olives, pickles, artichoke hearts and celery. And I surely have all the necessary ingredients for a Bloody Mary. Let’s do this!
Everyone has their own way of making their perfect Bloody Mary so I will just make suggestions and you can adjust to your liking. I use V-8. It just feels healthier. HA!
For 2 people I use one 12 oz can of V-8 and 4 shots of vodka, a splash of Worcestershire Sauce, about 3 shakes of Tabasco Sauce , the juice of half a lemon, a sprinkle of celery salt, a little pepper, and if you like…. some horseradish. –I never get to do the horseradish because hubby doesn’t like it. Mix up these ingredients and poor over ice in 2 glasses. Add a shake of Creole seasoning over the top of the glasses then add your skewers, bacon folded like an accordion pleat through one skewer and the Smoked Shrimp, with the baby pickles, olives and artichoke hearts on the other skewer. Garnish with a leafy celery stalk and there you have it. Surf and Turf Bloody Mary.


~Enjoy!

Crock-Pot Tomato Vodka Marinara


Our family is blessed with an abundance of tomatoes in the garden. I feel like I need to pick every one of them and not let any go to waste and I also feel that I am becoming a slave to the garden. I like to make everything from scratch and I love the process of canning tomatoes, but not every day! I have blogged about my homemade Vodka Marinara Sauce and everyone really enjoys it. Well, honestly I cannot go through that process every day, because I want to enjoy my summer days and play a little too. The last time I gathered up a bunch of tomatoes it was dusk and I thought to myself, “Why not combine the ingredients in the crock pot and let it cook down overnight”. “I could tip the lid and let the moisture escape and then blend the ingredients in the morning.” I did just that and it came out great. I did this for 3 nights in a row, refrigerating the marinara then after the 3rd cooking, I started the canning process the next morning. It made 9 quart size jars. Tonight I am going to start the process again, only I think I will do 4 batches before canning, as my canner holds 7 jars at a time. Now keep in mind that I have a Vitamix so I don’t need to peel and de-seed each tomato. The Vitamix pulverizes the seeds and peel to a beautiful silky texture. –Reason number 8,432 of why you should own a Vitamix. J
Here’s how I did it:
Crock-Pot Tomato Vodka Marinara.
Pick enough tomatoes to fill the crock pot.
I have learned with time that I can get more tomatoes in the
crock-pot by chopping them up in the food processor prior
to putting them in the crock-pot.

Add in 2 diced white or yellow onions,
3/4 cups Vodka
1/4  Cup Extra Virgin Olive Oil
1/2 Teaspoon Crushed Red Pepper –depending on how spicy you like it
2 teaspoons Salt
 1/2 teaspoons Pepper
1-1/2 Teaspoons Dried Oregano
1 1/2 Teaspoons Dried Basil
3 teaspoons Chopped Garlic
1 Teaspoon Fennel seed
1 Teaspoon Granulated Garlic
1 Teaspoon Granulated Onion
Some Fresh Basil for the Blending


Clean and chop the tomatoes. Combine all the ingredients into the crock pot and cook overnight with the lid tipped, for steam to escape, on high for 12 hours or until almost all of the liquid is cooked down. (If your tomatoes are super juicy, they require even more cooking time with the lid tipped to cook down). My last batch took more like 15 hours.

This is what is looks like after hours of being cooked down. My camera exposure was not set properly so it looks a little pink here, as opposed to the vibrant red and yellow it really was.
Blend the ingredients, adding about 10 Basil leaves and possibly some sugar to balance out the acidity. (taste the sauce first to see if it even needs sugar) I almost always add sugar.

Voila! you have yummy sauce.

Now if you like a chunkier marinara, you can peel and de-seed the tomatoes and cook down the marinara the same way and just use an emersion blender mildly on the marinara to your liking of how chunky you like it.
And there you have it. Wonderful marinara to enjoy with so many things. At this point you can choose to can it, freeze it, or enjoy with the evenings dinner.


~Enjoy!

Saturday, August 2, 2014

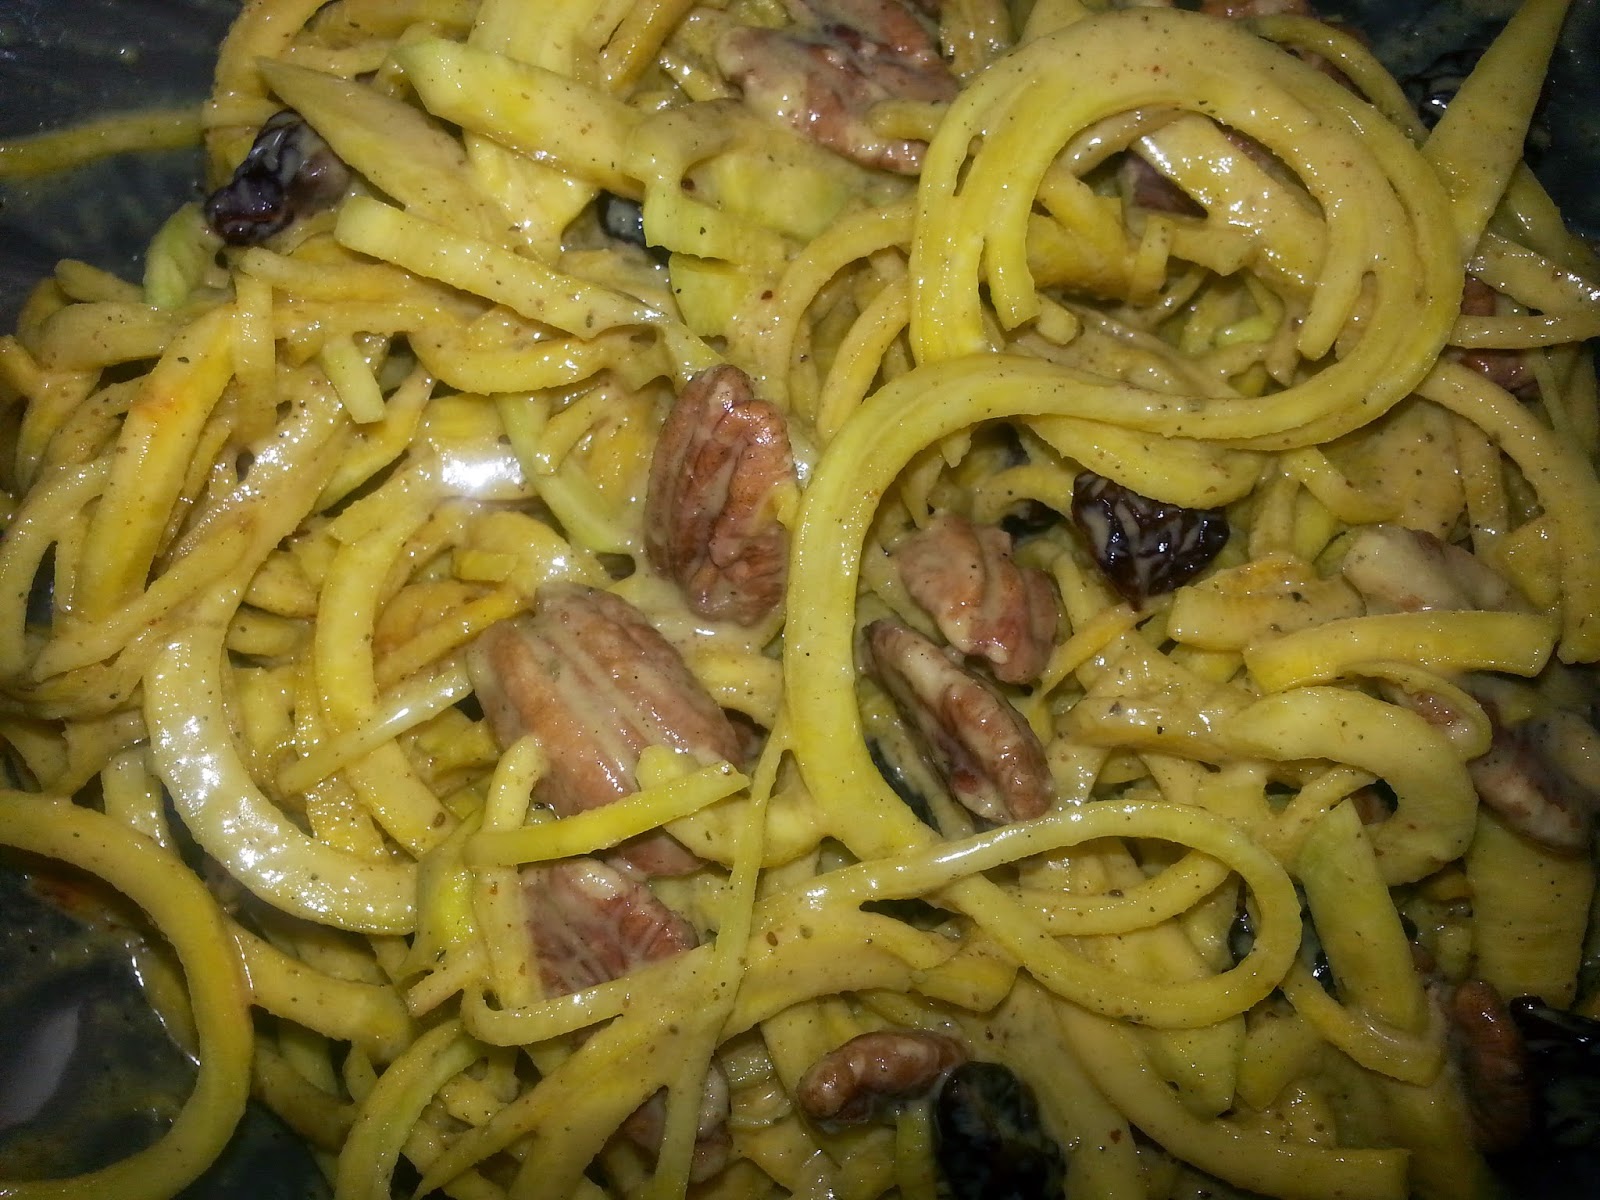
Golden Beet Salad with Thai Green Curry Dressing

Have you ever been inspired by a type of food used in an unconventional way? I have. A few months back my friend Theresa posted Zucchini Spaghetti. How did she get the Zucchini into those long noodles. She told me she got one of those spiralizers. I looked it up and saw all kinds of brands and knew I had to have one. Last week I bought a Spirooli. We had company in from out of town and Ed, the brother-in-law, was supposed to be on a strict vegan diet. I decided to make zucchini spaghetti, with my homemade marinara and it was a big hit.
Fast forward to today. I was at the grocery store in the produce section and the golden beets looked wonderful. “I am going to make a salad with it.” The wheels got to spinning and this is what I came up with.


Golden Beet Salad with Thai Green Curry Dressing
3 Large Golden Beets
2/3 cup Pecans
½ cup Dried Cherries
For the dressing (Combine the below ingredients into a blender and blend until smooth)
½ cup Rice Wine Vinegar
¼ cup Extra Virgin Olive Oil
1 tablespoon Sesame Oil
1-1/2 Teaspoons Grated Ginger
2 tablespoons Honey
2 tablespoons Whole Grain Mustard
1 tablespoon Thai Green Curry Paste
3 teaspoons White spice Rub (click for recipe)
½ teaspoon Crushed Red Pepper
2 Cloves Garlic
1 Medium Shallot
Clean and peel the outer layer of the beets. Spiralize the beets into a pile on a cutting board. 


With a large knife, cut an X across the pile. This will help in not having such long pieces for the salad. Combine the beets, pecans and dried cherries and toss with the dressing. Let it chill for 2 hours before serving.

~Enjoy!